Documentation
Free SSL Certificate Automation Client / App
Install and Configure 'FreeSSL.tech Auto'
VIDEO TUTORIAL
Step A
Download the Client / App
Please click the button below to download the app (2.71 MB). This zip archive comes with all the dependencies pre-installed.
Step B
Upload the app to your web hosting server
Now upload the zip archive to the document root of any of your websites or sub-domain (e.g., www.YourDomain.com or http://sub.YourDomain.com) or any other publicly available directory of your web hosting server. Extract the uploaded archive. You’ll get a directory named FreeSSLDotTechAuto-master. Don’t forget to rename this directory, e.g., mycert.
If your web hosting control panel is cPanel, you may follow the steps and screenshots given below:
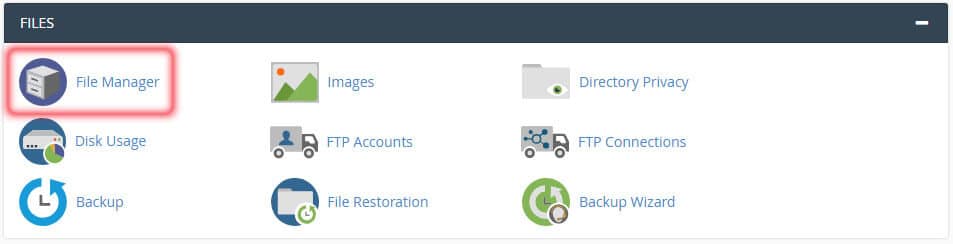
1. Click the File Manager option under ‘Files’ in your cPanel:
2. In the pop-up window Select the WebRoot / Document Root of your website, select ‘Show Hidden Files’ (dotfiles) and click Go.
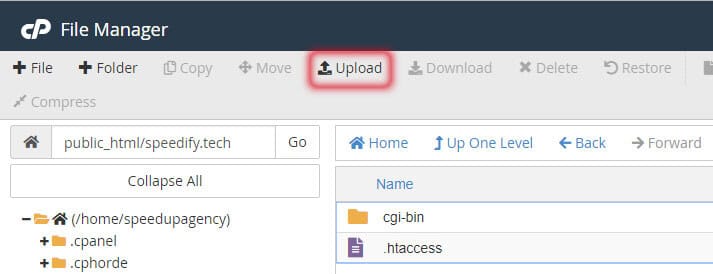
3. Click upload option under the top toolbar. This option opens another window. (If you prefer to upload the app in a sub-directory, click ‘Folder’ option at top-left and create a folder (directory). Open the folder by double-click it and then click the upload option.)
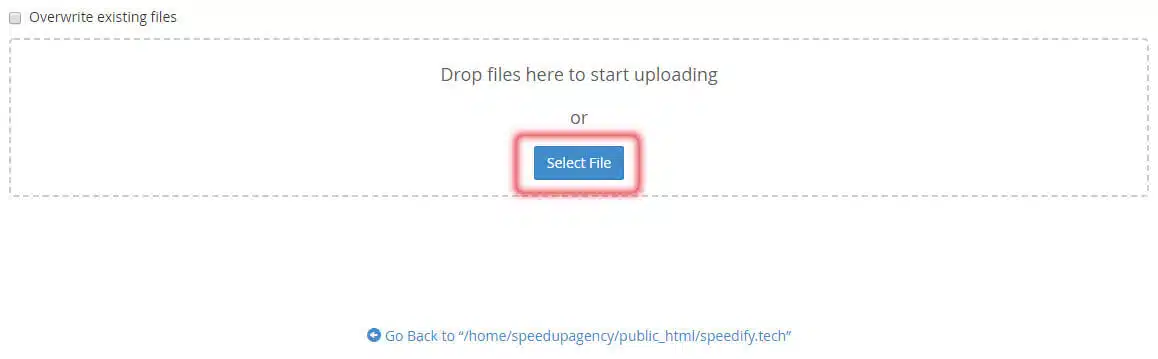
4. Click Select File button in the new window.
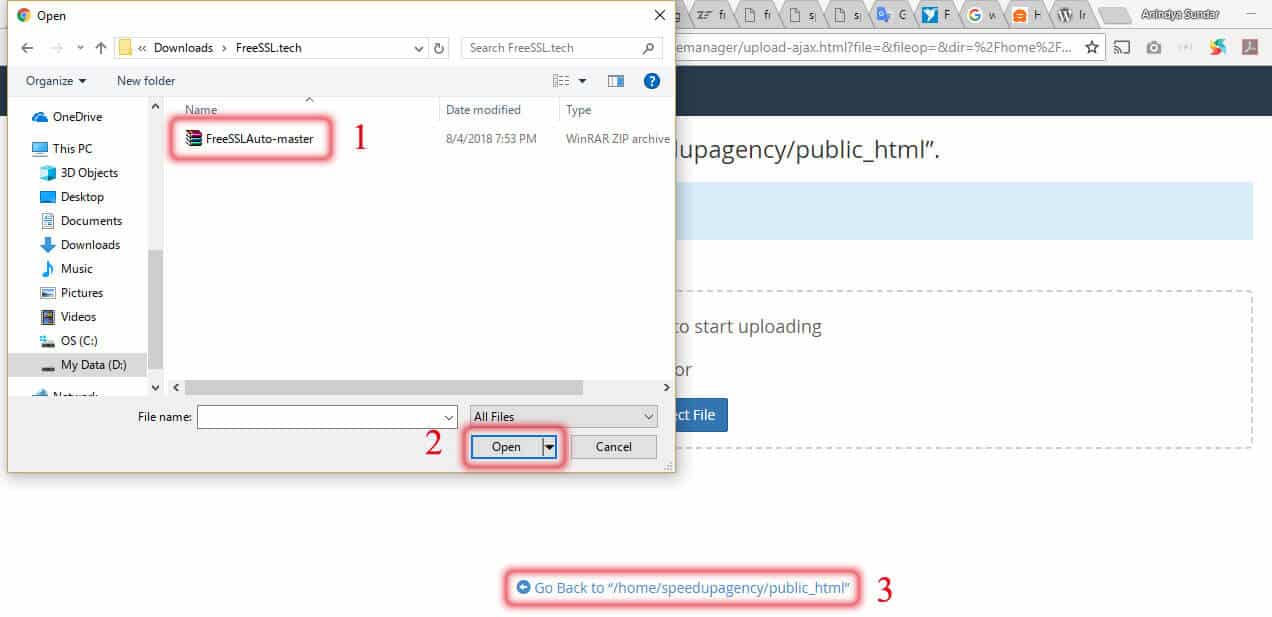
5. Browse to the zip archive you downloaded in step A and click Open. When the upload completes click Go Back to “home/username/public_html/…” link at the bottom of the page.
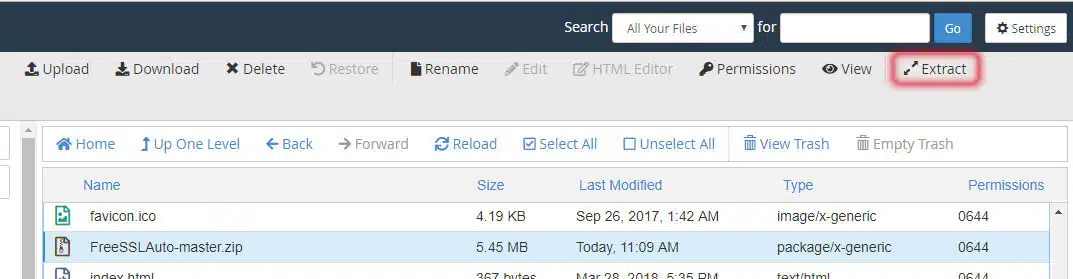
6. Now select the uploaded zip in the file manager and click on Extract at the right side of the top toolbar.
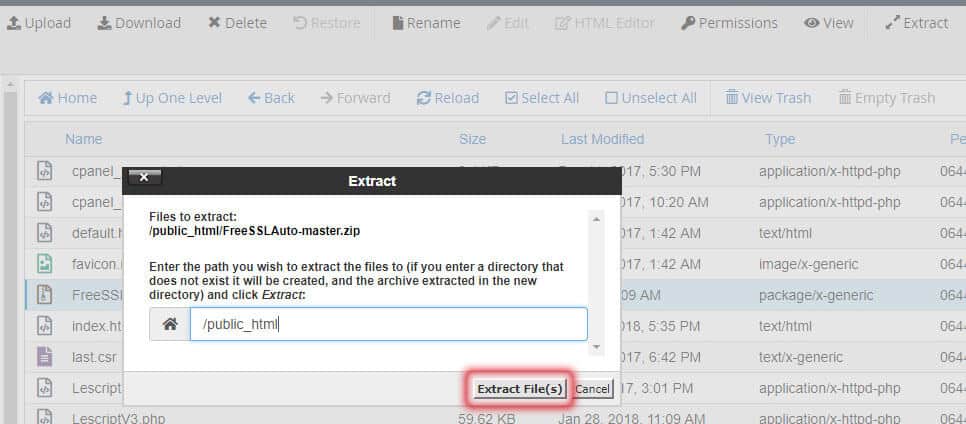
7. A pop-up window opens. Click Extract File(s) button.
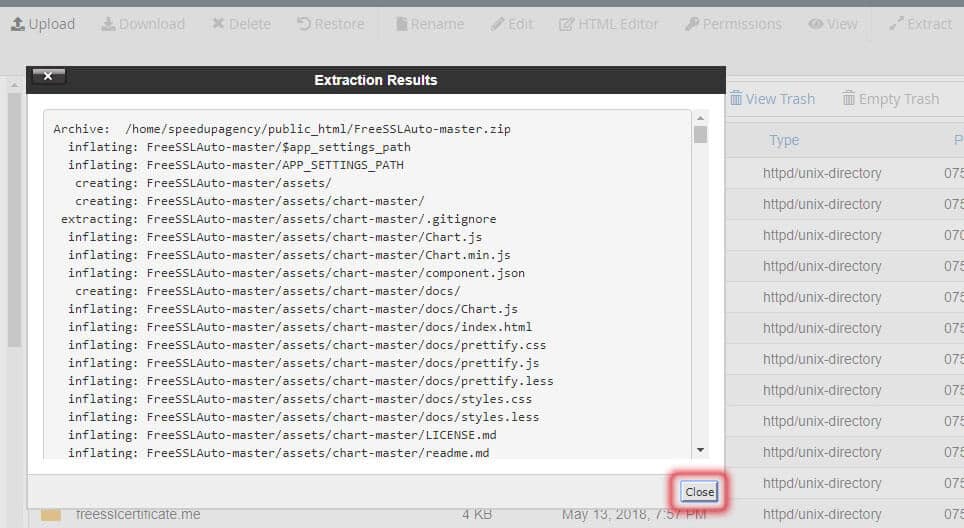
8. When extract completes, a confirmation window ‘Extraction Results’ opens. Click Close.
9. A new folder/directory has been created, named FreeSSLDotTechAuto-master.

Right click on this directory and select Rename.

10. Type the new name, let’s say ‘mycert’ and click the Rename File button.

Step C
Install the dependencies via Composer
{If you downloaded the archive with all the dependencies pre-installed (i.e., Step A, option 2), please skip this step.}
Please run the following commands.
$ cd public_html/mycert
$ composer install
Step D
Create a MySQL (or MariaDB) database and user
In your web hosting control panel, create a MySQL (or MariaDB) database and user, with all privileges.
In this example, we are using cPanel.
1. Click MySQL Databases under the ‘Databases’ group of your cPanel.

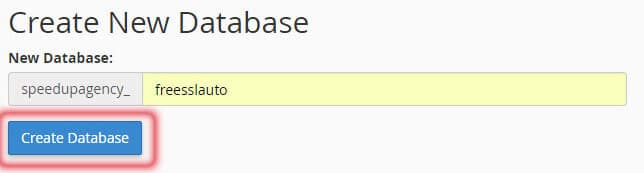
2. On the next page, you’ll find a form to Create New Database.

Type any database name of your choice and click the ‘Create Database’ button.
On the next page (confirmation page) click the ‘Go Back’ link.

3. So, you have created a MySQL database. Now you need to create a database user.
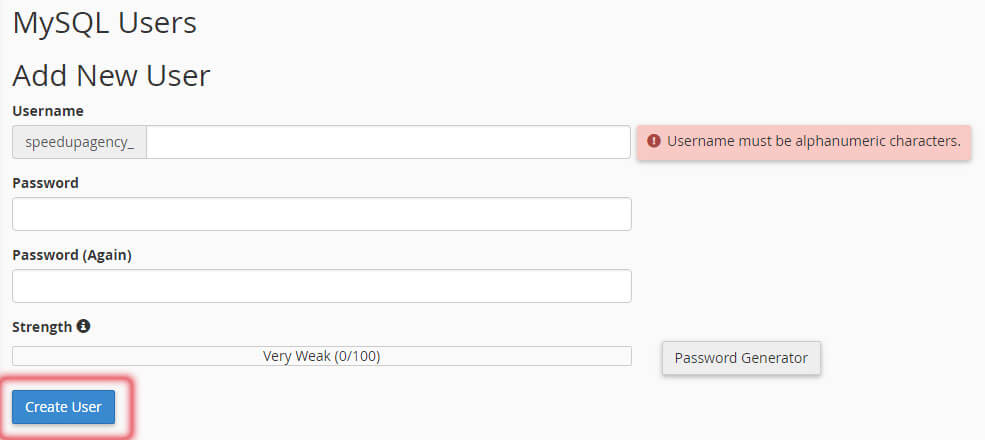
Please scroll down the MySQL Databases page, and you’ll find MySQL Users section. There is a form Add New User. Type username and password of your choice and click Create User button. If you use the ‘Password Generator’ to create your password, don’t forget to copy it. On the next page (confirmation page) click on the Go Back link.
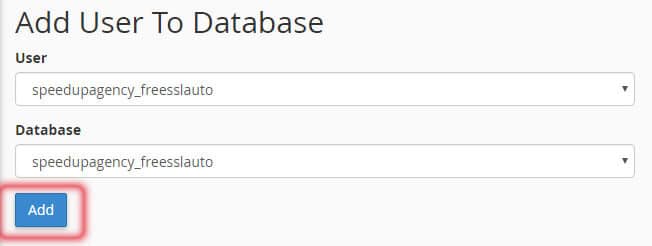
4. Now you need to add the user to the database with all privileges so that the user can access the database and perform all actions. In the MySQL database page, just below the Add New User form, there is a section called Add User To Database. Select the user and database from the drop-down menu and click Add.
5. On the next page click on the ALL PRIVILEGES checkbox. This selects all other checkboxes (privileges) in that form. Now click Make Changes button.
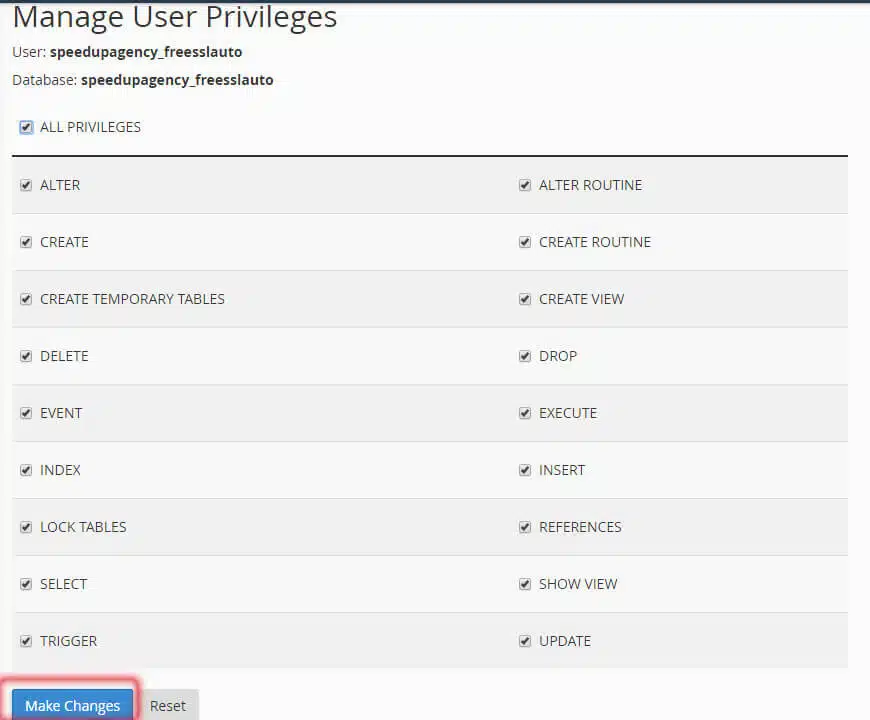
You’ll get a confirmation message. The user is added to the database successfully with all privileges. Now click the Go Back link.
Step E
Run the Installation Script
Now access the app using a web browser. The URL is something like this: www.YourDomain.com/mycert
If the current domain (YourDomain.com) has an existing SSL certificate installed, directly go to the ‘Install the app with HTTPS (recommended)’ section.
Otherwise, if you access the app over an unencrypted connection (HTTP), you get the installation page like the following screenshot.
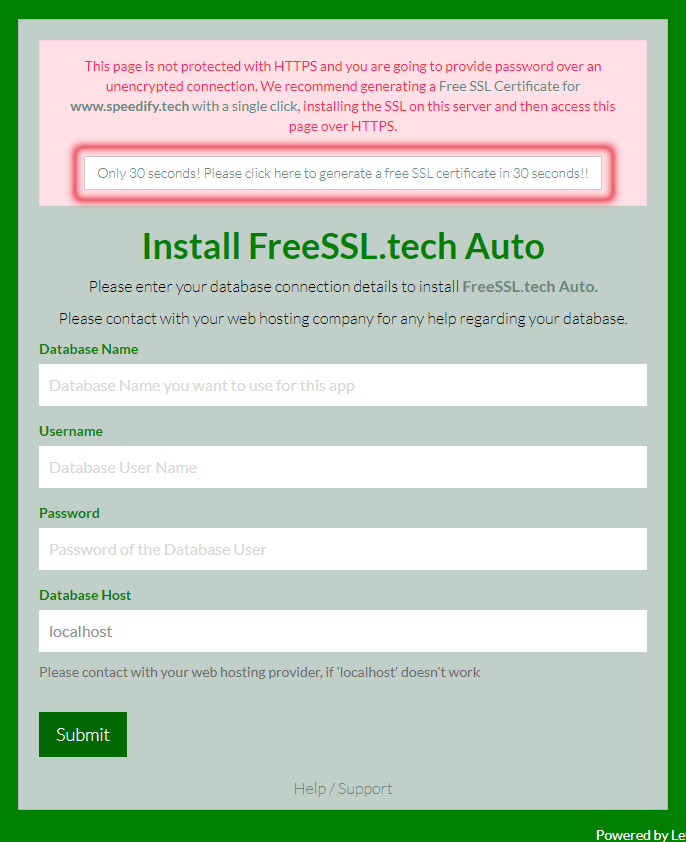
This page is not protected with HTTPS, and you are going to provide password over an unencrypted connection. So you get an option to issue a free SSL certificate for the current domain (YourDomain.com) with a single click. Click on the large button that says “Only 30 seconds! Please click here to generate a free SSL certificate in 30 seconds!!” Now you get a page like a screenshot given below:
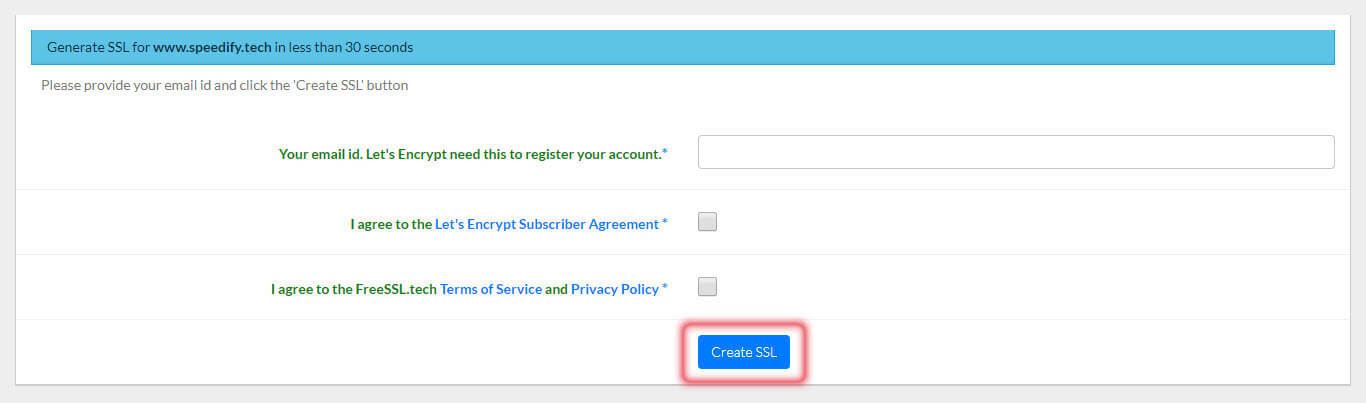
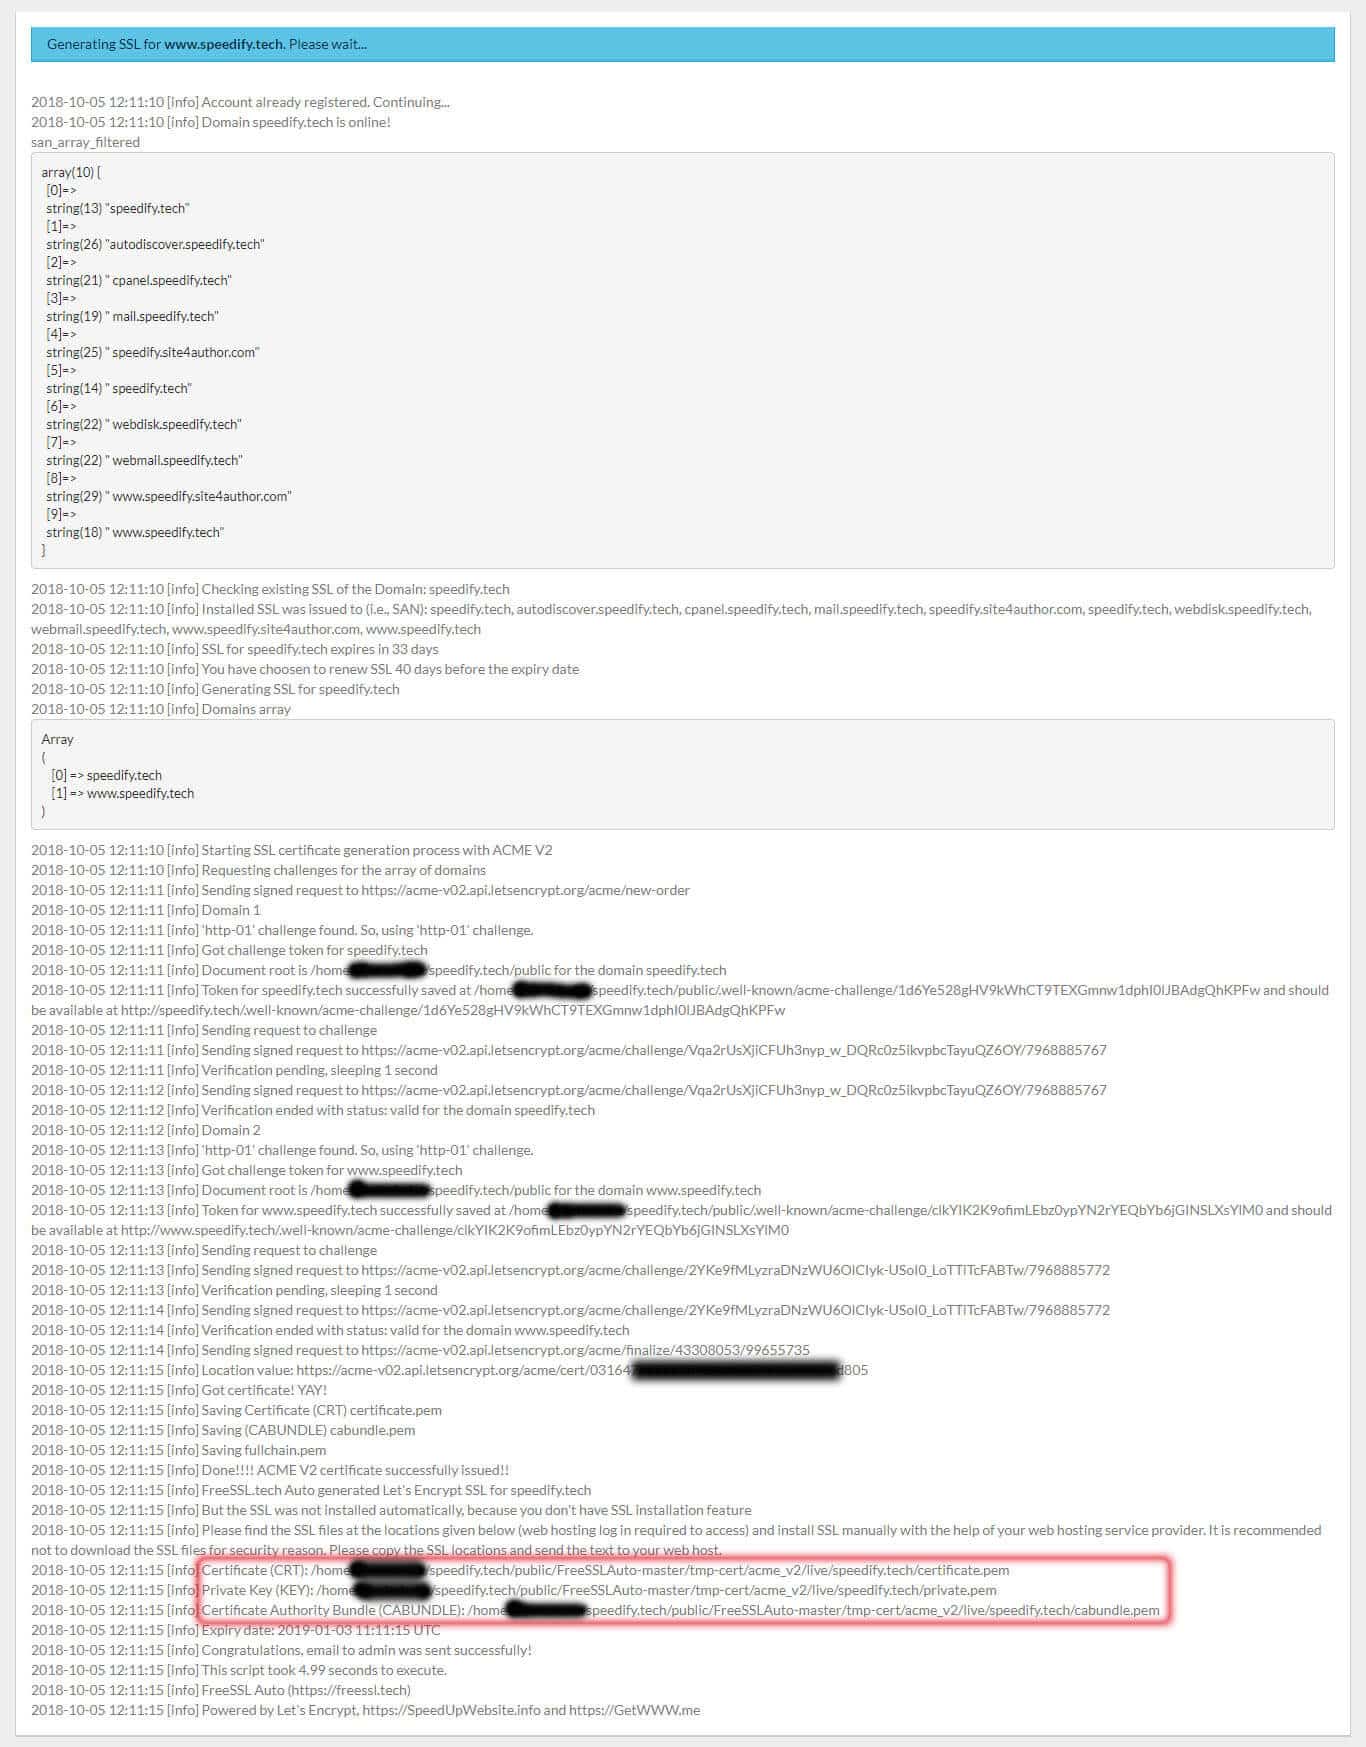
Provide your email id, read & agree (click the checkboxes) to the Let’s Encrypt Subscriber Agreement, FreeSSL.tech Terms of Service and Privacy Policy. Now click on the Create SSL button. You get a Let’s Encrypt SSL in less than 30 seconds. You get information (on that page and by email) about the directory location where the app has saved free SSL certificate, private key, and CA bundle. For example, we have marked this section with a red rectangle in the following screenshots.
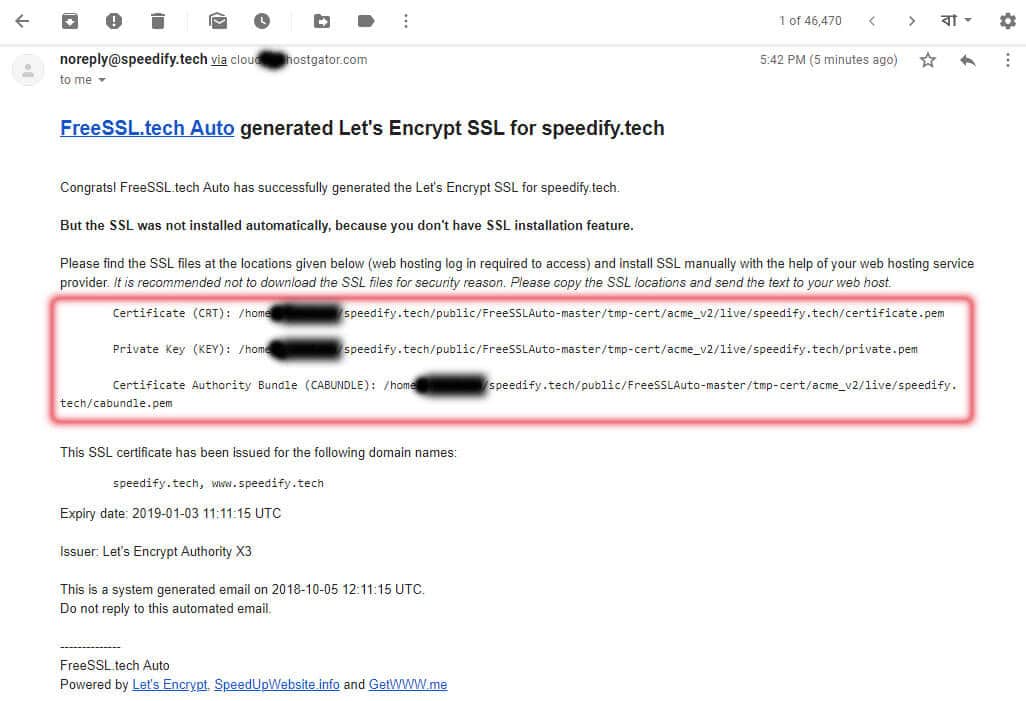
A sample of email notification given below:
If your web hosting control panel (e.g., cPanel) has SSL installation feature enabled, you can install the SSL certificate on YourDomain.com easily.
Otherwise, contact your web hosting provider to install the SSL certificate for you. For security, reason, please don’t download the SSL certificate, private key and CA bundle. Instead, copy-paste the location of these files from the page or email and send that text to your web hosting provider.
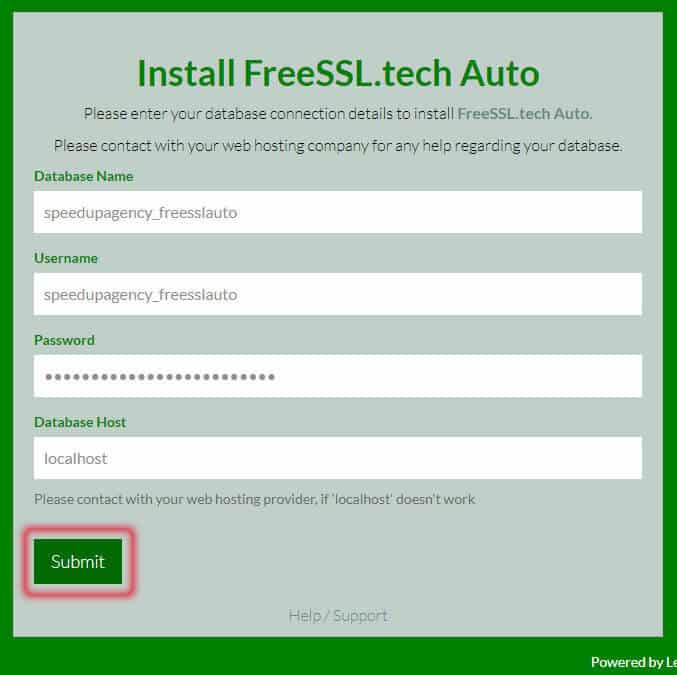
Install the app with HTTPS (recommended)
If you access the app with HTTPS, you get the installation page like the following screenshot.
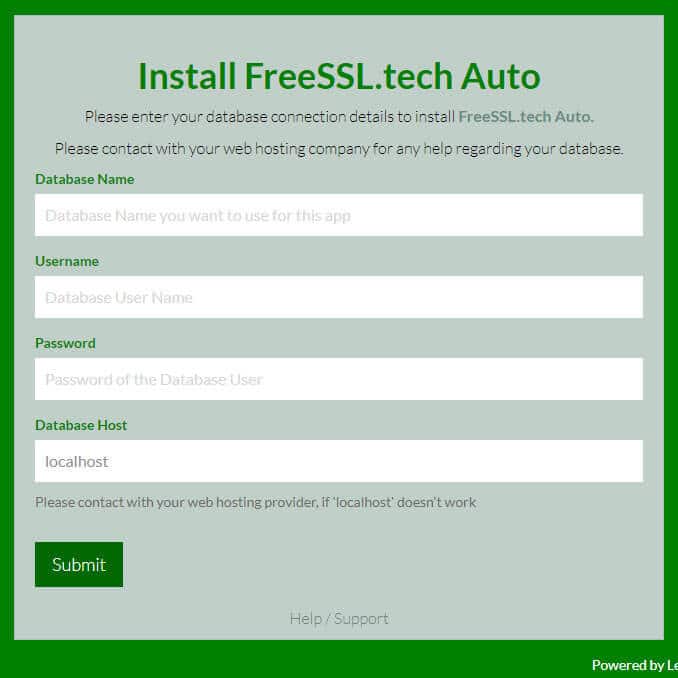
Now fill in the form with the database name, username, and password you created for this app and click on the Submit button.
You’ll get the next page (step 2) of the installation script. The screenshot is given below:

Now you are going to create your admin account for the app. Fill in the form with your email id and set a password. Then click on the Submit button.
Congrats! You have successfully installed the FreeSSL.tech Auto app.
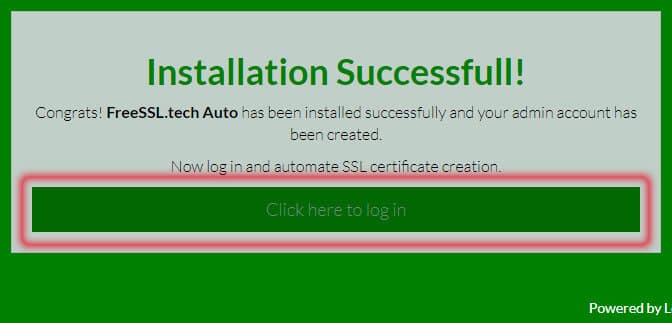
You get a confirmation message and a large button which links to the login page. Click on it.

Step F
Configuration
Now that you have logged in using the admin email and password, you get the dashboard like the following screenshot:
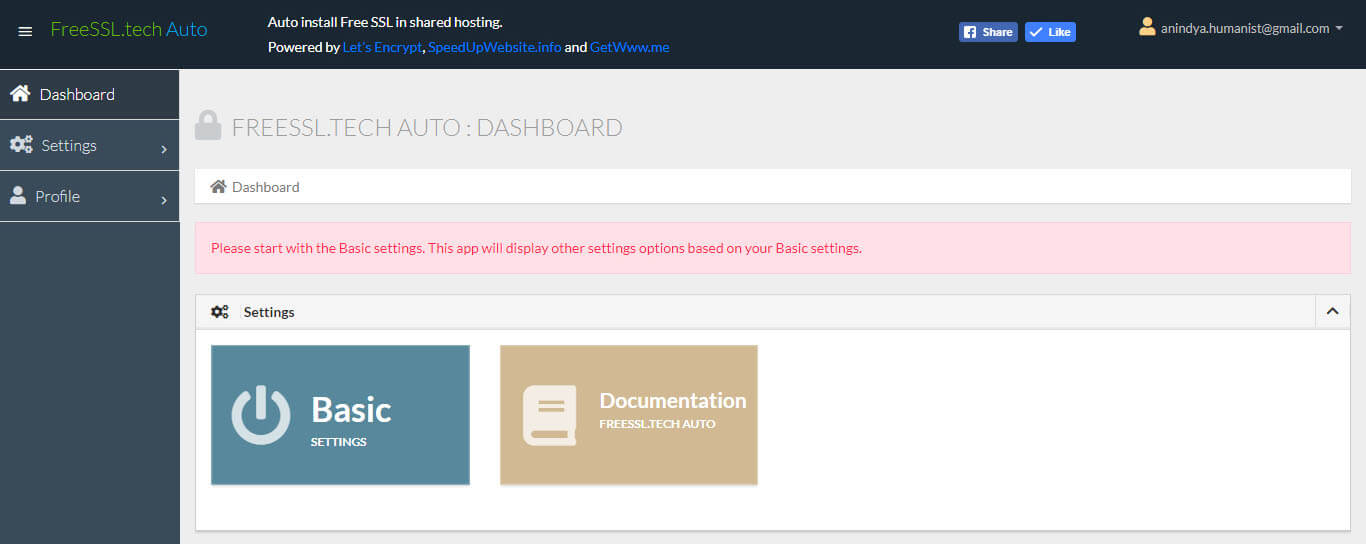
Initially, you get only one option (basic settings) on the dashboard. The app displays other options based on the information you provide with ‘basic settings.’ So click ‘basic settings’, and you get the form like the screenshot given below.
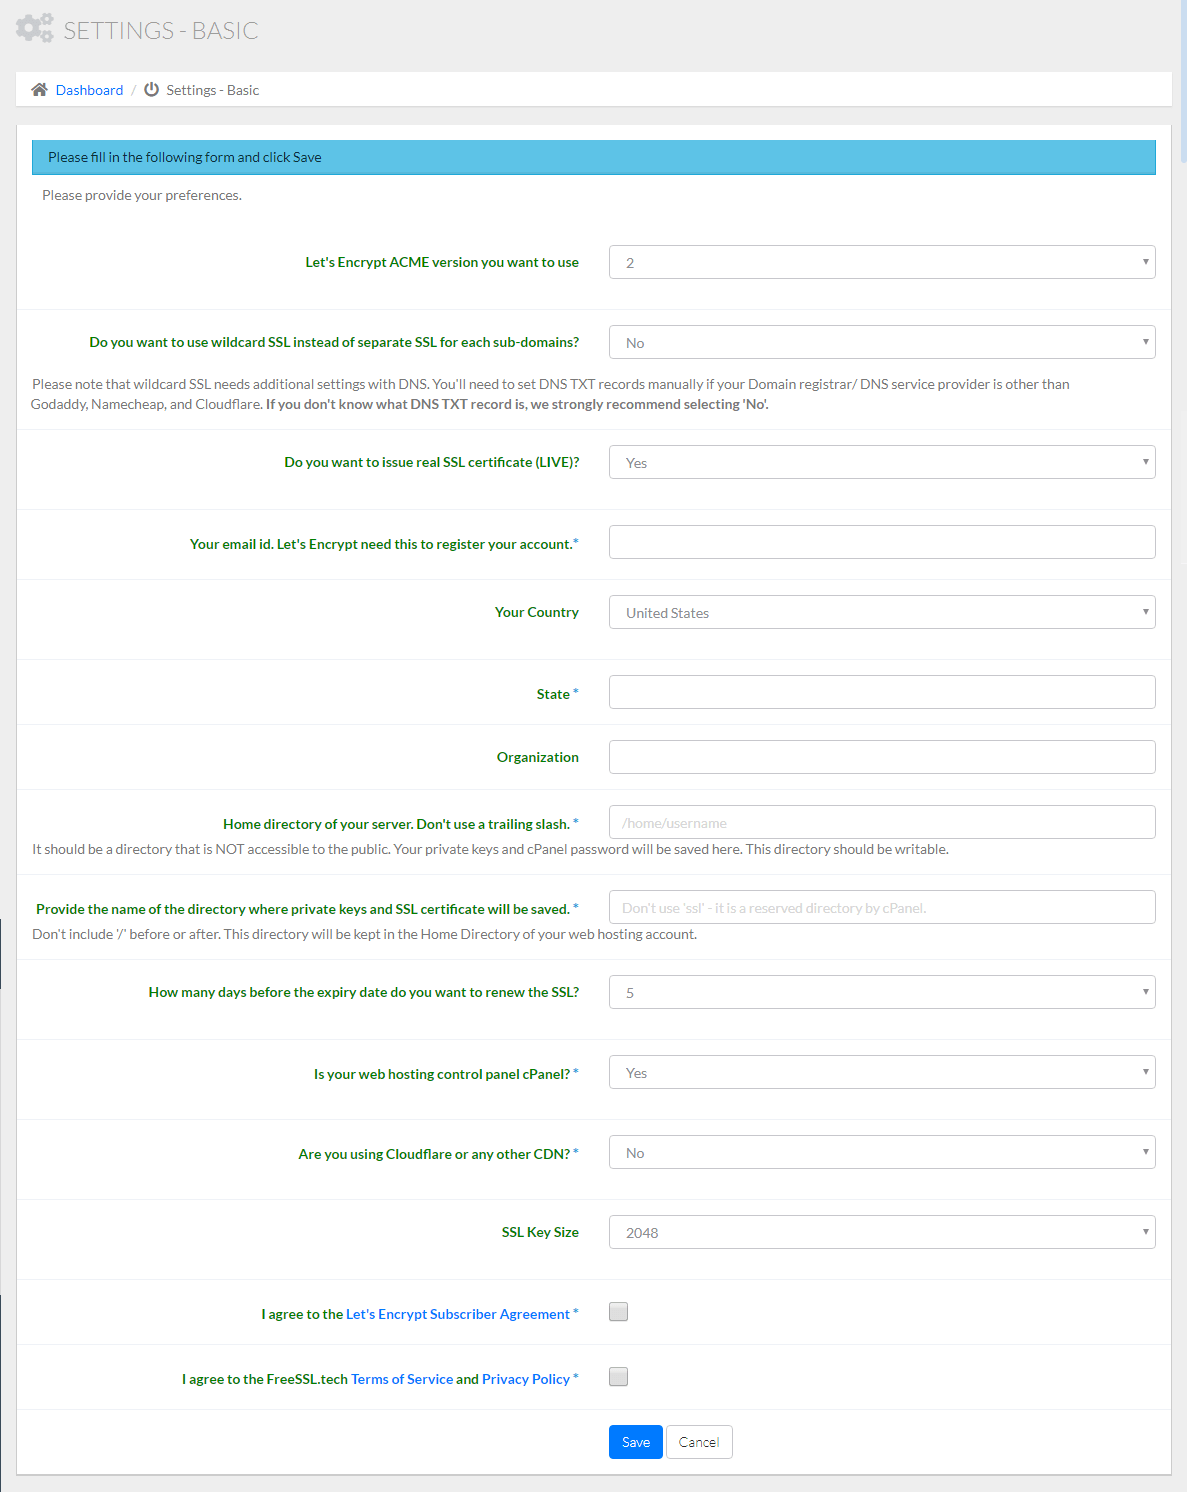
All the fields are self-explanatory. Fill in the form with appropriate information and click the ‘Save’ button. The app redirects you to the next form and so on. You may anytime click the ‘Dashboard’ menu from the navigation of the left sidebar to access the dashboard. However, we recommend filling in the form one by one, as per the app redirects you.
Four types of screenshots of the complete dashboard are given below. You get any one of them.
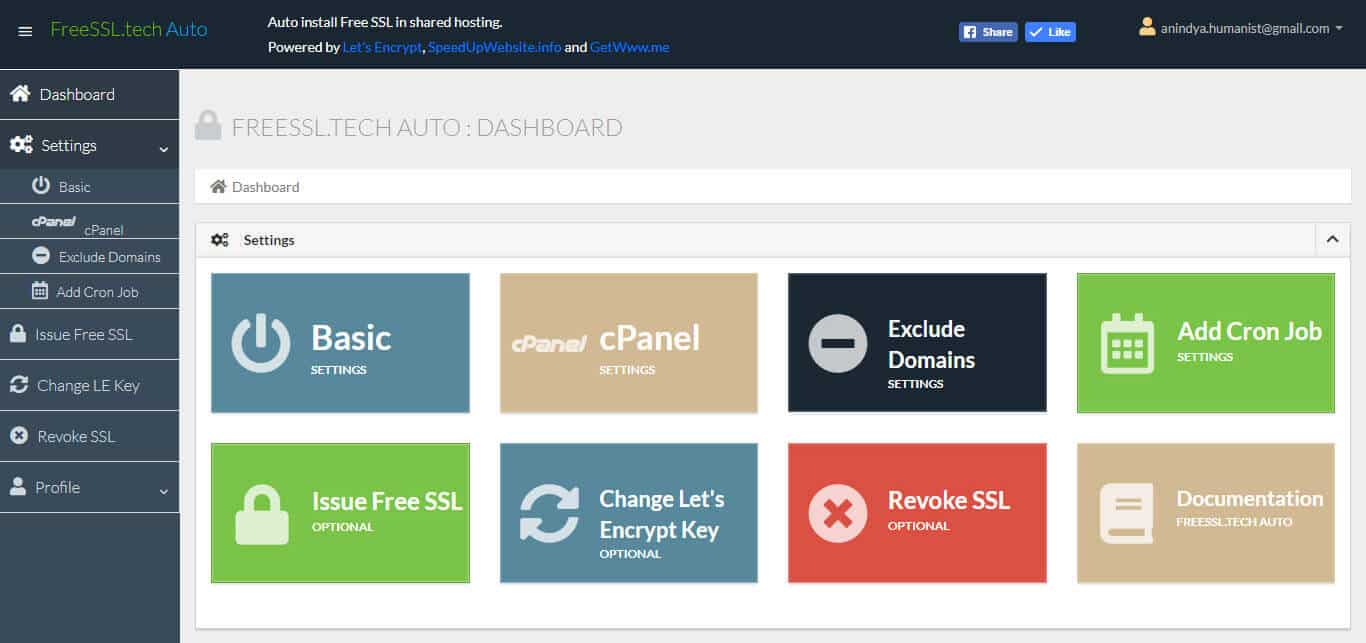
Case 1: If Control panel is cPanel, ACME V2 and Wildcard SSL selected, the dashboard looks like the following screenshot:

Case 2: If Control panel is cPanel, ACME V1 or V2 and you don’t need Wildcard SSL, the dashboard looks like the following screenshot:
Case 3: If the Control panel is NOT cPanel, ACME V2 and Wildcard SSL selected, the dashboard looks like the following screenshot:

Case 4: If the Control panel is NOT cPanel, ACME V1 or V2 and you don’t need Wildcard SSL, the dashboard looks like the following screenshot:
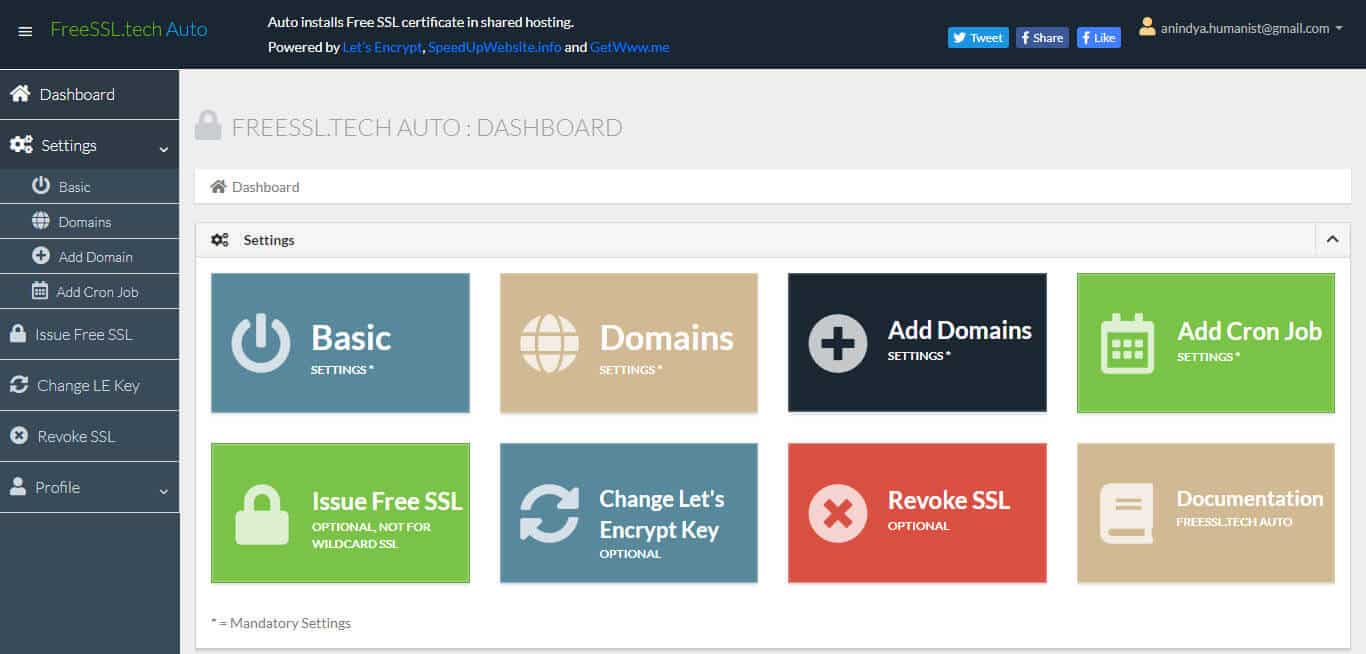
The settings which we have marked with ‘*’ are the mandatory settings. The options are available in the navigation of the left sidebar as well. Let’s introduce them:
Basic settings *:, This is the very first option you start. The app displays other options based on the information you provide here.
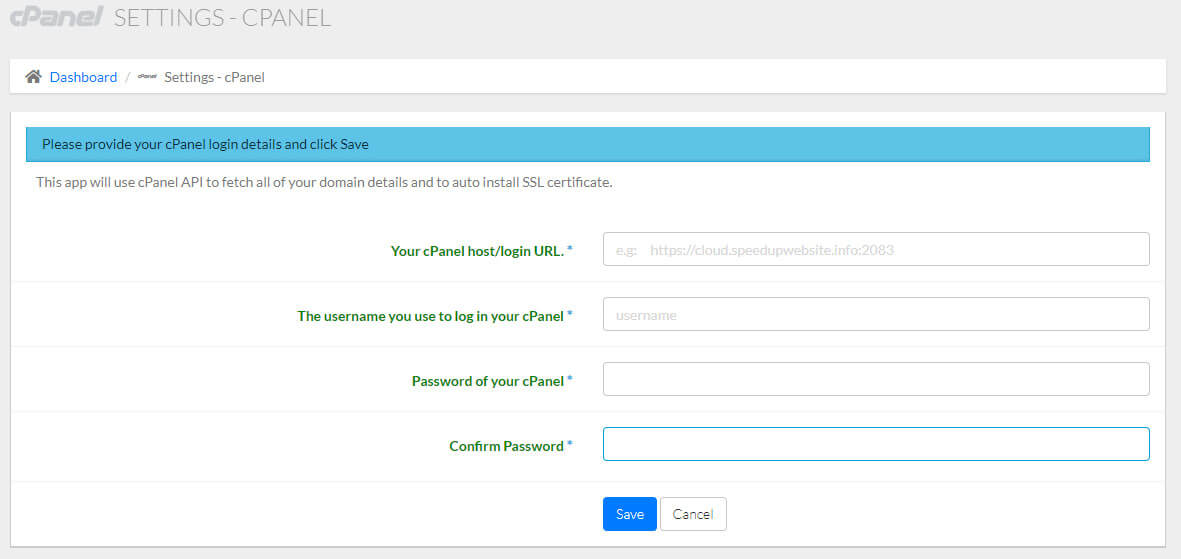
cPanel settings *: You get this option if your web hosting control panel is cPanel. You need to provide your cPanel login details here. We use OpenSSL encryption to save your cPanel password as encrypted text and store above your public_html folder.
This app uses cPanel API to fetch all of your domain details and to automate the installation of free SSL certificates. That means complete automation (including SSL certificate installation) of your free SSL certificates even in shared hosting cPanel. However, if your cPanel doesn’t have SSL installation feature, please contact your web hosting provider for SSL installation. You receive an automated email for every issue/renewal of SSL. The email contains the path to SSL files. You can merely copy-paste path of SSL files and send it to your web hosting provider for installation.
Screenshot of the cPanel settings form given below:
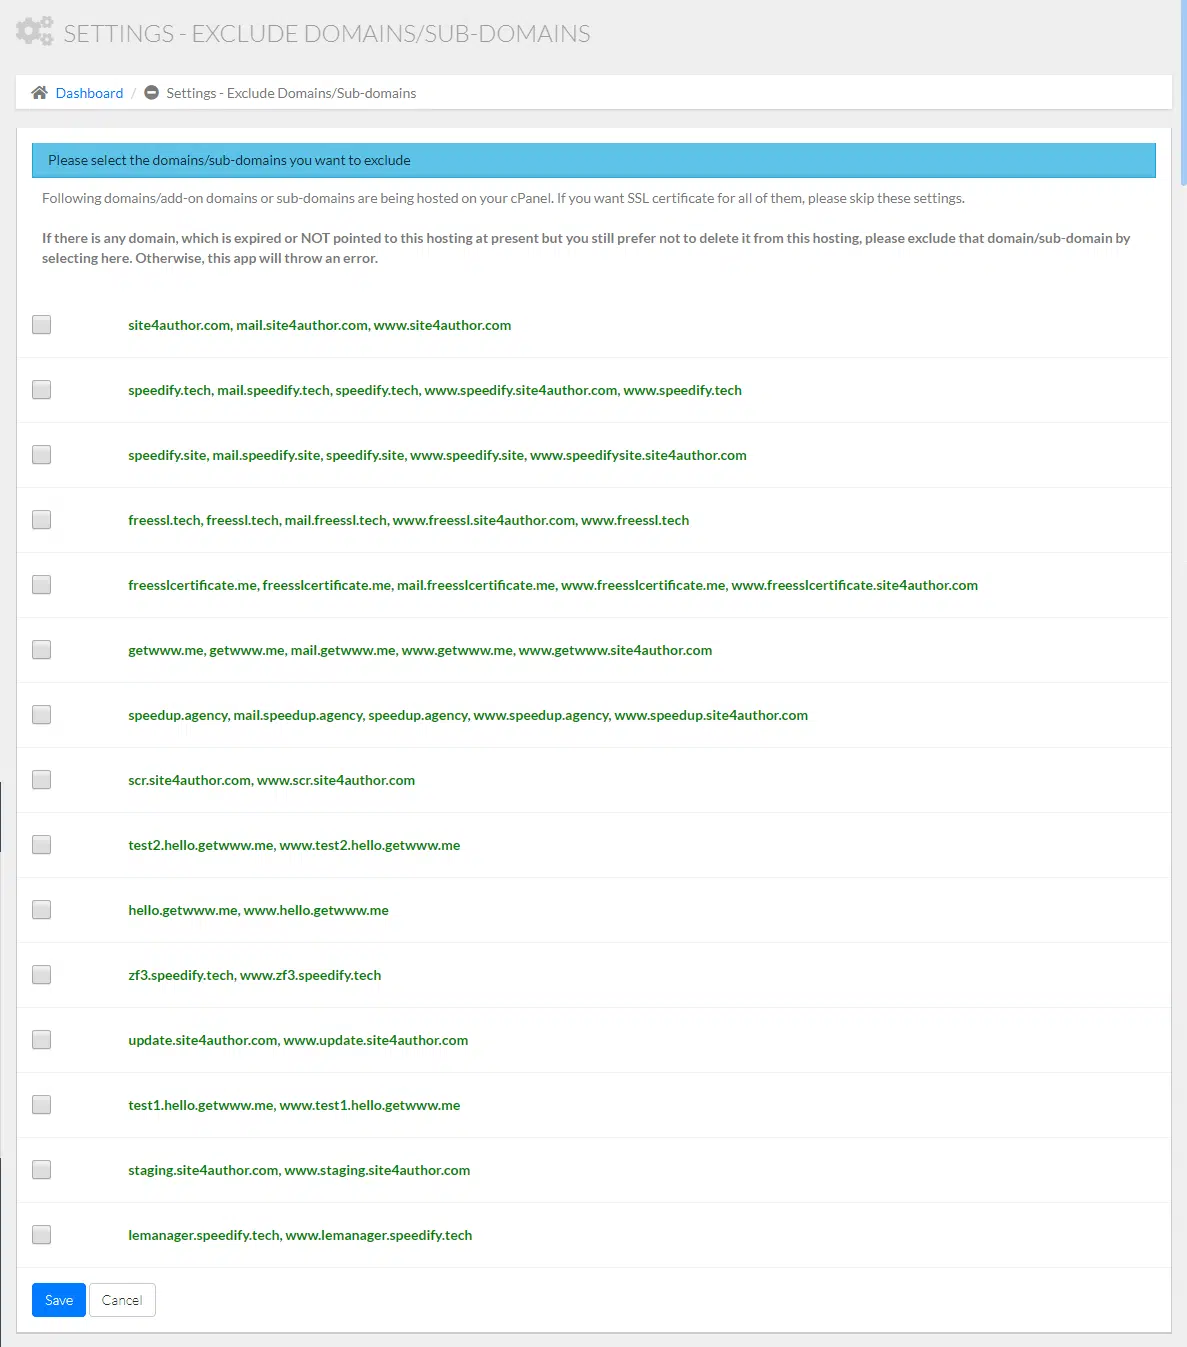
Exclude Domains (optional): You get this option if your web hosting control panel is cPanel. This option is optional. If you want free SSL certificates for all the domains and sub-domains in your cPanel, please skip this option. However, if there is any domain in your cPanel, which is expired or NOT pointed to this hosting at present but you still prefer not to delete it from this hosting, you should exclude that domain/sub-domain by selecting the respective checkbox and click ‘Save’ button. Otherwise, this app throws an error.
Screenshot of the Exclude Domains form given below. You get the domains as per the hosted domains and sub-domains in your cPanel
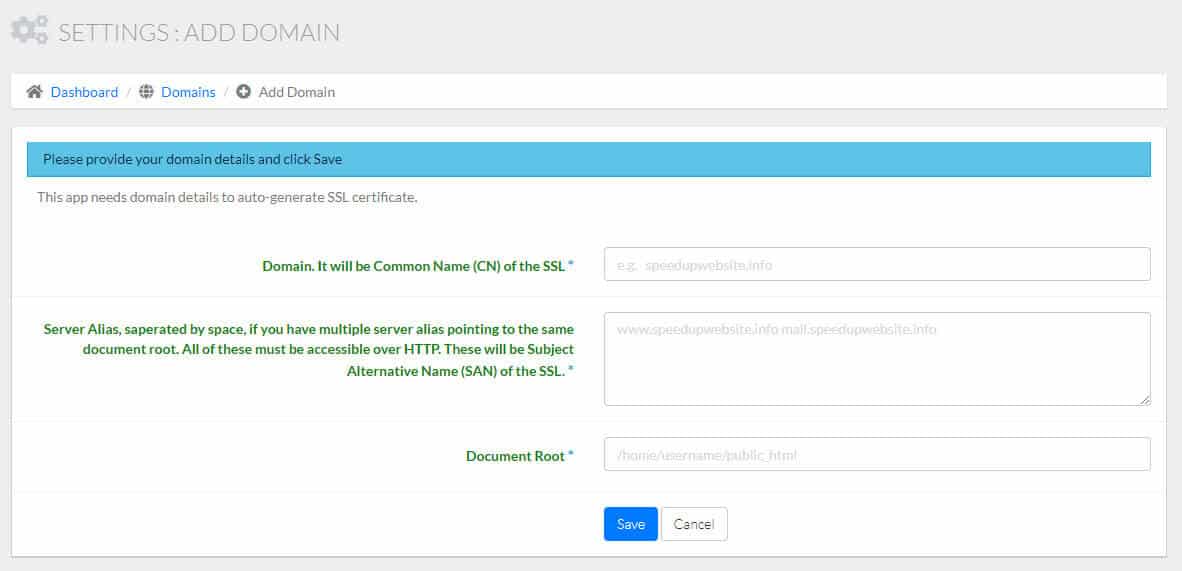
Add Domains *: You get this option if your web hosting control panel is NOT cPanel. This app needs your domains’ details, which are hosted on your web hosting server, to auto-generate free SSL certificates. You can provide your domain details with this option.
Screenshot of the Add Domains form given below:
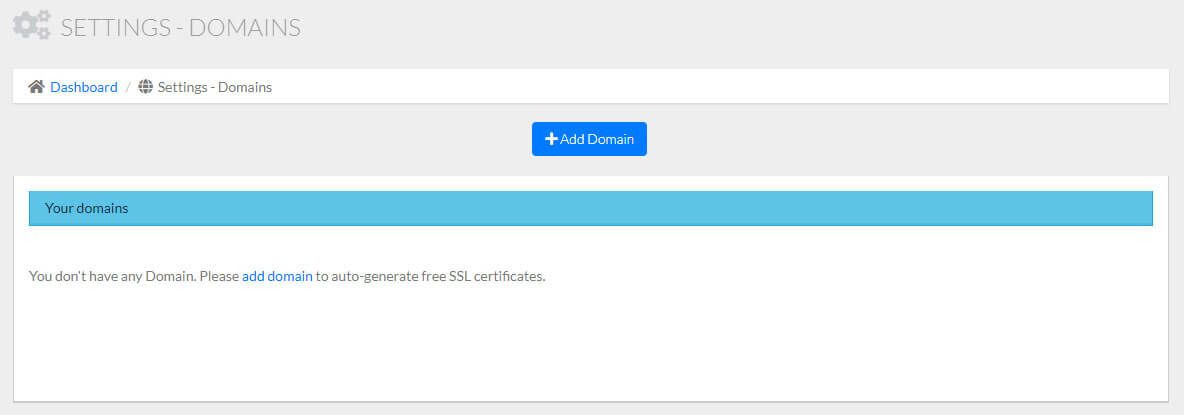
Domains *: You get this option if your web hosting control panel is NOT cPanel. This option lists all the domains’ data you entered with ‘Add Domains’ form.
Screenshot of the Domains page given below:
DNS Service Providers *: You get this option only if you want to issue free wildcard SSL certificates. This app needs your DNS Service Provider’s details to set DNS TXT record to verify your domains automatically. Setting DNS TXT record is the only challenge type Let’s Encrypt ACME V2 API uses to issue free wildcard SSL certificates.
Supported DNS Service Providers are cPanel, GoDaddy, Namecheap, and Cloudflare. You may add multiple DNS providers, if applicable.
If your DNS service provider is other than cPanel, GoDaddy, Namecheap, and Cloudflare, you may skip making entry.
Screenshot of the DNS Service Providers page given below:

Screenshot of the Add DNS Service Provider form given below:

API Identifier: For Godaddy your ‘API Key’ is the API Identifier. For Cloudflare your login ’email’ is the API Identifier. For Namecheap your ‘username’ is the API Identifier.
API Credential: For Godaddy your ‘API Secret’ is the API Credential. For Cloudflare and Namecheap your ‘API Key’ is the API Credential.
If your DNS Service Provider is cPanel, you have already provided the credentials in cPanel settings. You need to provide other details here, like: ‘Domain names managed by this DNS Service Provider’ and ‘Does the DNS Service Provider take longer than 2 minutes to propagate?’
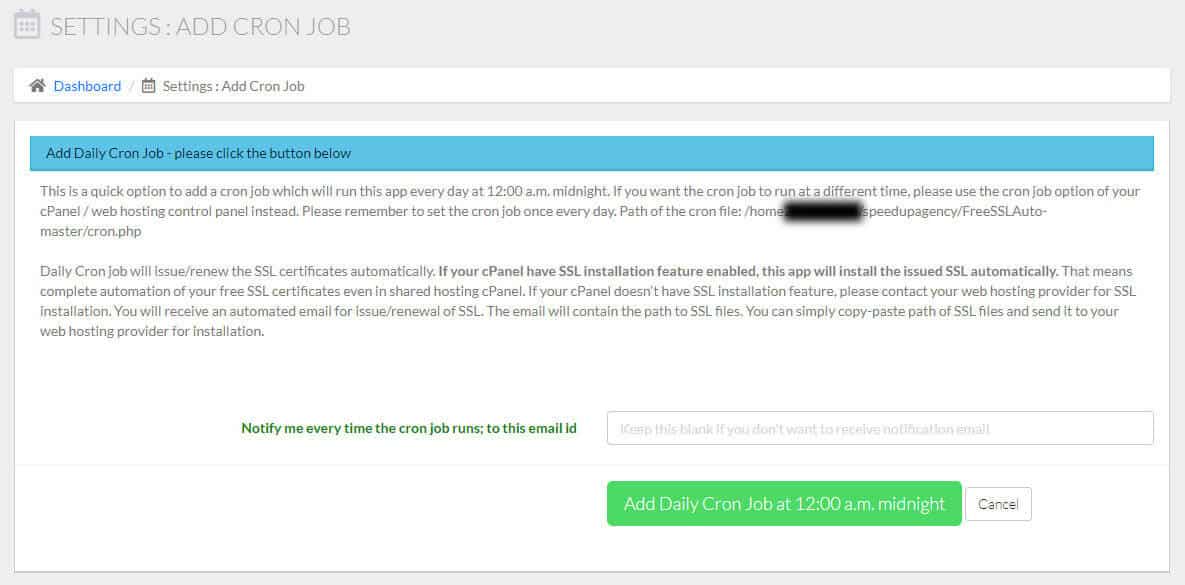
Add Cron Job *: If you have done all the required settings now, it’s time to add a cron job. You can do this from this option’s page with just a single click. No Linux command line expertise required. The cron job runs this app automatically once every day at 12:00 a.m. midnight (your server’s time zone) to issue/renew and install the Let’s Encrypt free SSL certificates.
If you want the cron job to run at a different time, please skip this option and use the cron job option of your cPanel / web hosting control panel. Remember to set the cron job at least once every day. You’ll get the path of the cron file in this option’s page.
Path of the cron file: If the absolute path of the app directory is /home/username/public_html/mycert, Path of the cron file is /home/username/public_html/mycert/cron.php.
The ‘Add Cron Job’ page shows you the actual cron file path.
Screenshot of the Add Cron Job form given below:
WAIT, HOW ABOUT 20% OFF
for the Premium WordPress Plugin?
If you have cPanel and WordPress website, you can set up 100% SSL automation in 1 minute with the Premium Plugin, even if you have no Technical Expertise.
expires in
Support
Need us for any help? Please write your issue in the comment section below.