Documentation
Auto-Install Free SSL (free version)
Free SSL Certificate Plugin for WordPress – SSL issued by Let’s Encrypt™
Video Tutorial
[cPanel] Installing the Plugin and then Generating & Installing a Free SSL Certificate for Your WordPress Website
Learn how to install the ‘Auto-Install Free SSL’ plugin effortlessly and generate a free SSL certificate for your WordPress website using the plugin. This step-by-step video will guide you through installing the generated SSL certificate on your cPanel, ensuring your website’s security and enhancing user trust.
Begin by watching the video tutorial below:
[Plesk] Plugin Installation and Free SSL Certificate Generation & Installation for Your WordPress Website
Discover the step-by-step process of effortlessly installing the ‘Auto-Install Free SSL’ plugin and generating a free SSL for your WordPress website using the plugin. This comprehensive video tutorial will guide you through installing the generated SSL certificate on your Plesk, ensuring the security of your website and boosting user trust.
Begin by watching the video tutorial below:
written tutorial
If you prefer written tutorials, here’s the written version:
To automatically install the ‘Auto-Install Free SSL’ plugin, follow these simple steps:
- Please log in to your WordPress dashboard (i.e., backend/admin area).
- Go to the ‘Plugins’ menu in sidebar and click on ‘Add New’.
- In the ‘Search plugins…’ field, type ‘Auto-Install’.
- Once you find the plugin, click on ‘More Details’ and then on the ‘Install Now’ button.
- Now, click the ‘Activate’ button.
After completing the installation, proceed to the AFTER ACTIVATION section below.
MANUAL PLUGIN INSTALLATION
If you prefer manual installation, follow these instructions:
- Download the ‘Auto-Install Free SSL’ plugin’s zip archive by clicking here.
- Choose either the WordPress, cPanel, or FTP method (similar steps for other web hosting control panels).
a) With WordPress dashboard:
- Please log in to your WordPress dashboard (i.e., backend/admin area).
- Go to the ‘Plugins’ menu in sidebar and click on ‘Add New’.
- Click the ‘Upload Plugin’ button.
- The upload option will be visible. Click the ‘Choose File’ button and select the downloaded zip archive.
- Click the ‘Install Now’ button.
- Click the ‘Activate Plugin’ button.
After completing the installation, proceed to the AFTER ACTIVATION section below.
b) With cPanel:
- Please log in to your cPanel and click the ‘File Manager’ menu.
- Now, navigate to your WordPress website’s document root (e.g., /home/username/public_html) and open /wp-content/plugins/ directory.
- Click on the ‘Upload’ menu at the top.
- A new window will be visible. Drag and drop the downloaded plugin’s zip archive on the upload area. The zip archive will be uploaded in a few seconds (depending on the zip size and the speed of your internet connection).
- After completing the upload, click on the Go Back to the “/home/username/public_html/wp-content/plugins” link at the bottom.
- Right-click on the plugin’s zip archive, choose ‘Extract’, and then click the ‘Extract Files’ button.
- Once the extraction is finished, close the extraction results window.
- At the top-left, find the ‘Go’ button. Click it to refresh the directory structure, and you should see the ‘auto-install-free-ssl’ directory.
- Now proceed to the point-number 3 below.
- Extract the plugin’s zip file on your computer. A folder named ‘auto-install-free-ssl.x.x.x’ (replace ‘x.x.x’ with the latest version) contains the ‘auto-install-free-ssl’ folder.
- Log in to the web server using preferred FTP client (e.g., FileZilla).
- Navigate to the document root of your WordPress website and then to the /wp-content/plugins/ directory.
- Upload the ‘auto-install-free-ssl’ folder to this directory.
- Now proceed to the point-number 3 below.
3. Log in to the WordPress dashboard and go to the ‘Plugins’ page. You will find ‘Auto-Install Free SSL’ listed there. Click the ‘Activate’ button to activate the plugin. You’re done!
AFTER ACTIVATION
After activating the ‘Auto-Install Free SSL’ plugin, you will be redirected to a page powered by Freemius. On this page, we kindly request your consent to opt-in for our security and feature update notifications and non-sensitive diagnostic tracking. You will find detailed information and relevant links to learn more about these aspects. Your cooperation in allowing us to collect non-sensitive usage data is greatly appreciated, as it helps us improve the free SSL plugin. The decision to opt in or opt-out is entirely up to you.
How to generate Free SSL Certificate for your WordPress website
To generate a free SSL certificate, follow these steps:
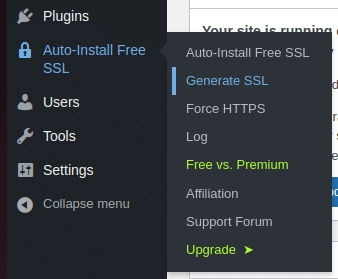
1. After completing the previous step, you will be redirected to the Generate SSL page. If not, you can navigate to the ‘Auto-Install Free SSL’ menu in the sidebar and select the ‘Generate SSL’ option. You can refer to the provided screenshot for assistance.
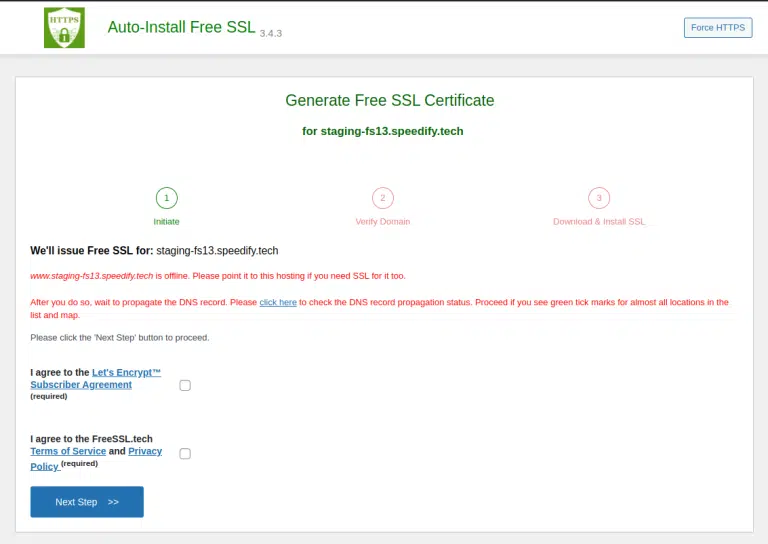
2. On the ‘Generate Free SSL Certificate’ page, carefully read and agree to the Let’s Encrypt™ Subscriber Agreement and the FreeSSL.tech Terms of Service & Privacy Policy. To proceed, click the relevant checkboxes and then click the ‘Next Step’ button. Confirm by clicking ‘OK’ in the displayed confirmation dialog box. You can refer to the provided screenshot for visual guidance.
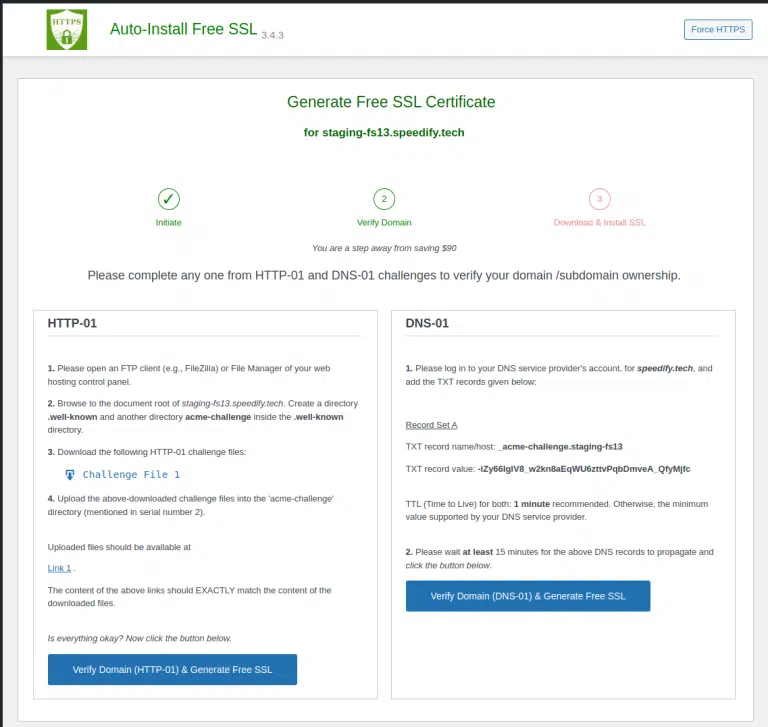
3. Please wait for a few seconds as the plugin creates connections to the Let’s Encrypt™ server. Next, you will encounter the second step, known as ‘Verify Domain.’ Please refer to the accompanying screenshot for further clarification. There are two methods available for verifying domain ownership: HTTP-01 and DNS-01. You need to complete one of these methods only. This guide will focus on the HTTP-01 method, which is the most popular, easiest, and time-saving option.
To complete the HTTP-01 verification method, please follow these steps:
a. Log in to the web server using any FTP client like FileZilla or the file manager provided by your web hosting control panel (e.g., cPanel, Plesk, etc.).
b. Navigate to the document root directory of your WordPress website. Typically, the path will be like /home/username/public_html. Now create a directory, ‘.well-known’, and Inside the ‘.well-known’ directory, create another directory called ‘acme-challenge’.
c. Download the HTTP-01 challenge files by clicking the links labeled ‘Challenge File 1’ and ‘Challenge File 2’. Note that you will only receive one challenge file if your WordPress website’s ‘www’ alias does not point to your web server (i.e., it is offline).
d. Upload the downloaded challenge files to the ‘acme-challenge’ directory you created in step 2.
e. The uploaded files should be accessible via the links provided (‘Link 1’ and ‘Link 2’). Click on these links to verify that the content of the links exactly matches the content of the downloaded files. If the match is correct, click the ‘Verify Domain (HTTP-01) & Generate Free SSL’ button. In the confirmation dialog box, click ‘OK’.
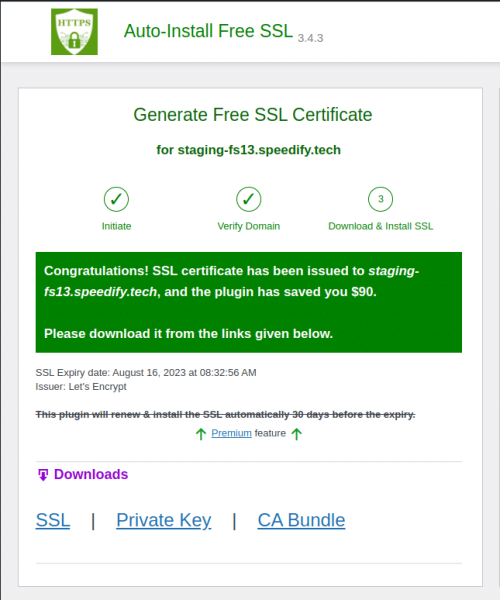
f. Wait for a few seconds while our plugin connects to the Let’s Encrypt™ server and generates the free SSL certificate for your WordPress website. The page will look like the following:
g. To obtain the free SSL certificate, click the links to download the SSL, Private Key, and CA Bundle files in the ‘.pem’ format.
h. After obtaining the SSL certificate files, log in to the control panel of your web hosting and install the free SSL certificate on your WordPress website.
1. Log in to your cPanel account.
2. In the upper-right corner of the cPanel interface, you’ll find a “Search Tools” text box. Type ‘SSL’ into the search box and wait for the results to appear.
3. Among the search results, click on the ‘SSL/TLS’ option (not ‘SSL/TLS Status’).
4. On the SSL/TLS page, scroll down to the bottom, where you’ll find the section titled “INSTALL AND MANAGE SSL FOR YOUR SITE (HTTPS).” Click on the link labeled ‘Manage SSL sites’.
5. This will take you to the ‘Manage SSL Hosts’ page. Scroll down to the bottom of the page, where you’ll find the ‘Install an SSL Website’ section. In this section, you’ll find a form to install the SSL certificate.
6. From the ‘Select a Domain’ drop-down menu, choose the domain associated with your WordPress website.
7. Open the downloaded ‘certificate.pem’ file in a text editor. Copy all of its content, including ‘—–BEGIN CERTIFICATE—–‘ and ‘—–END CERTIFICATE—–‘. Paste this content into the ‘Certificate: (CRT)’ text area.
8. Similarly, copy the content of the ‘private.pem’ file and paste it into the ‘Private Key (KEY)’ text area.
9. Copy the content of the ‘cabundle.pem’ file and paste it into the ‘Certificate Authority Bundle: (CABUNDLE)’ text area.
10. Once you have filled in all required fields, click the ‘Install Certificate’ button. Wait for a few seconds while the installation process takes place.
11. After installing the SSL certificate, you will see a confirmation dialog box stating ‘SSL Host Successfully Installed.’ Click ‘OK’ to finish the installation.
Following these steps, you will successfully install the SSL certificate for your WordPress website using cPanel.
How to install the free SSL certificate using Plesk
1. Please log in to the Plesk control panel.
2. In the left menu, click on the ‘Websites & Domains’ option.
3. You will find several options after clicking on the website for which you want to install an SSL certificate. Click on ‘SSL/TLS Certificates’.
4. On the next page, click the ‘Manage’ button in the ‘Download or remove existing certificates’ section.
5. Click the ‘Add SSL/TLS Certificate’ button on the following page.
6. You will be directed to the ‘Add SSL/TLS Certificate’ page.
7. Enter a name for the SSL certificate in the ‘Certificate Name’ text field.
8. Scroll down to the bottom of the page, where you will find the ‘Upload the certificate as text’ section. Here, you will find a form to install the free SSL certificate.
9. Open the downloaded ‘certificate.pem’ file in a text editor. Copy all of its content, including ‘—–BEGIN CERTIFICATE—–‘ and ‘—–END CERTIFICATE—–‘. Paste this content into the ‘Certificate’ text area in Plesk.
10. Similarly, copy the content of the ‘private.pem’ file and paste it into the ‘Private key’ text area in Plesk.
11. Copy the content of the ‘cabundle.pem’ file and paste it into the ‘CA certificate’ text area in Plesk.
12. Once you have filled in all the required fields, click the ‘Upload Certificate’ button.
13. The uploaded SSL certificate will be listed on the next page.
14. Click ‘Websites & Domains’ in the left menu again.
15. Click on the website for which you want to install a free SSL certificate.
16. Go to the ‘Hosting & DNS’ tab and select the ‘Hosting Settings’ option.
17. On the ‘Hosting Settings’ page, click the ‘Certificate’ selection field and choose the SSL certificate you just uploaded.
18. Click the ‘Apply’ button and then click ‘OK’.
Congratulations! The free SSL certificate has been installed for your WordPress website using Plesk.
Your website can now be accessed using ‘https://’, which indicates a secure connection.
It’s important to note that the steps may vary if you use a web hosting control panel other than cPanel or Plesk. However, the general concept remains the same.
To activate the Force HTTPS or HTTPS redirect feature after installing the SSL certificate, please follow these steps:
1. In the WordPress dashboard’s sidebar, find the ‘Auto-Install Free SSL’ menu and mouse over it.
2. From the drop-down options, select ‘Force HTTPS’.
3. Click the ‘Activate Force HTTPS’ button on the next page.
4. A confirmation dialog box will appear. Click ‘OK’ to proceed.
5. After clicking ‘OK’, you will be automatically logged out and redirected to the WordPress login page.
6. Log in to your WordPress dashboard again using your credentials.
7. Once logged in, refresh your website’s home page.
8. You should now see the padlock symbol indicating your WordPress website uses HTTPS.
By activating the Force HTTPS feature, your website will redirect all HTTP requests to HTTPS, ensuring a secure connection for your visitors.
Please be aware that the free SSL certificate provided by Let’s Encrypt™ has a validity period of 90 days. This means you must repeat the process of generating and installing an SSL certificate every 60 days. Let’s Encrypt™ recommends renewing the free SSL certificate at least 30 days before it expires.
Click the ‘Re-generate (renew) SSL’ button to initiate the renewal process.
Alternatively, if you opt for the premium version of this plugin, it will automatically handle the domain-ownership verification, generation, installation, and renewal of your free SSL certificate. Watch the following video tutorial (1:42 min) to see how effortless it can be.
If you want to upgrade to the premium version, please click here.
Securing your website with an SSL certificate is essential for data privacy and user trust.
The premium version of this plugin depends on cPanel API for the Automatic Installation of the generated free SSL certificate.
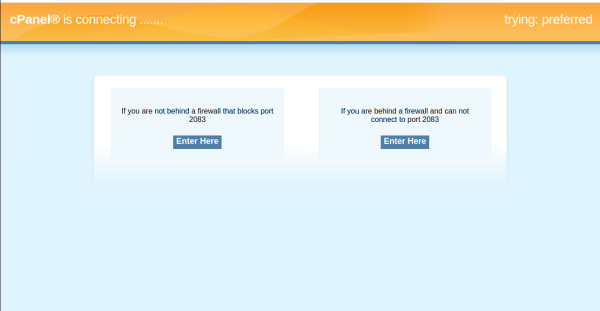
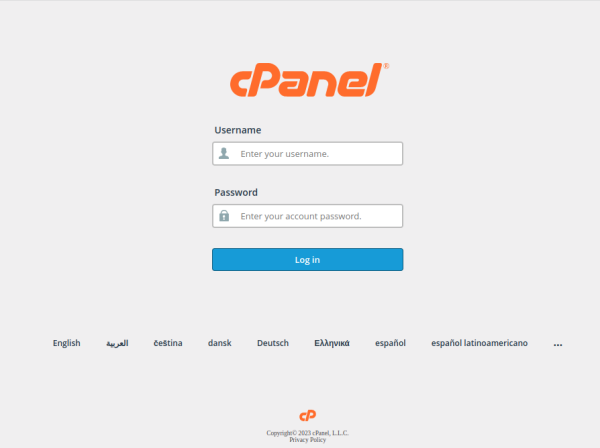
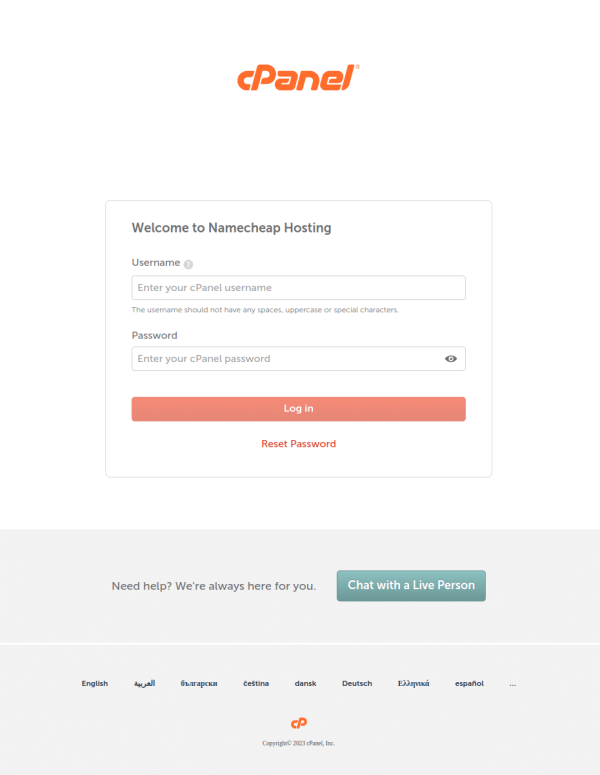
To check if a website uses cPanel, add ‘/cpanel’ or ‘:2083’ to the end of the website address and access it with a web browser. For example, if your website address is ‘yourdomain.com’, write “http://yourdomain.com/cpanel” or “https://yourdomain.com:2083” in the address bar of your web browser and hit the ‘enter’ key.
If you are redirected to the cPanel login page, like any of the screenshots below, it indicates that the website has cPanel.
However, if a 404 error is displayed, it suggests that your website doesn’t have cPanel. In such cases, the premium version does all other tasks automatically except for the Automatic Installation of the SSL certificate.
If you are still unsure, you can contact your website’s hosting provider directly and inquire about the control panel they use. They should be able to confirm whether cPanel is being utilized for your website.
Auto-Install Free SSL PRO
ClosePremium Version Features
- Automatic Verification of Domain Ownership
- Automatic SSL Certificate Generation
- Automatic Installation of SSL (requires cPanel *)
- Automatic Renewal of SSL
- Automatic Cron Job
* Not sure if you have cPanel?
Click here to identify it.
